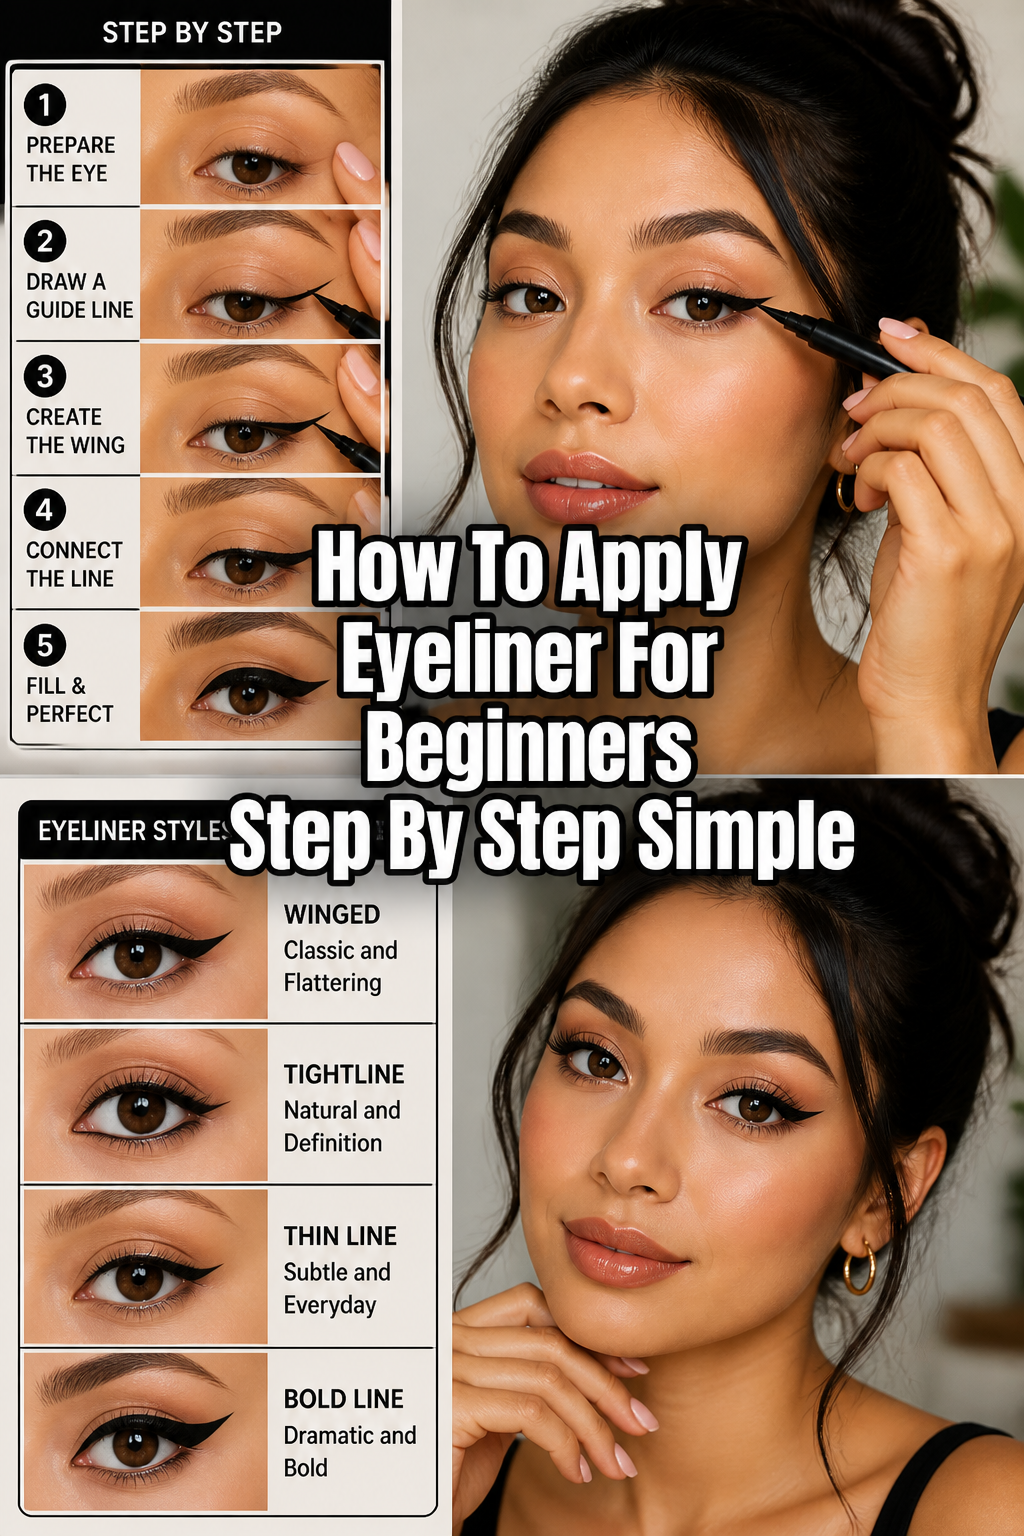
How To Apply Eyeliner For Beginners Step By Step Simple
🍏 The Daily Wellness Essentials
Building a healthier lifestyle doesn't require extreme makeovers—it's about making daily habits effortless. These are the 5 foundational tools that nutritionists and fitness experts universally recommend to keep hydration, nutrition, and movement on track every single day.
💧 Stanley Quencher H2.0 40oz Tumbler
The viral cup that genuinely lives up to the hype. Hydration is the undisputed foundation of health, and this massive, car-cup-holder-friendly insulated tumbler makes hitting your daily water intake goals completely thoughtless and remarkably easy.
🥑 Vitamix 5200 Professional-Grade Blender
The undisputed gold standard of blenders. Nutritionists swear by it because it completely pulverizes greens, seeds, and frozen fruits into silken smoothies without chunks—the absolute best investment for sneaking more whole foods into your daily routine.
🧘♀️ Manduka PRO Extra Thick Yoga Mat
Whether you are stretching to prevent back pain or doing intense home workouts, joint protection is critical. This ultra-dense, lifetime-guaranteed mat provides unmatched support and stability, making home exercise significantly more comfortable.
🍱 Bayco Glass Meal Prep Containers
The secret to eating healthy all week is preparation. Moving away from toxic plastics to these durable, oven-safe, and leak-proof glass containers makes storing, reheating, and actually enjoying your healthy prepped meals so much cleaner and safer.
🌱 Amazing Grass Greens Blend Superfood
Even with the best intentions, our diets often fall short on micronutrients. A single scoop of this high-quality greens powder covers your nutritional bases, boosts natural daytime energy without the jittery caffeine crash, and noticeably improves digestion.
✨ How To Apply Eyeliner For Beginners Step By Step Simple
Learning to apply eyeliner can feel like trying to draw a straight line on a moving train.
Many of us have been there, facing smudges and uneven wings with frustration.
I remember countless mornings practicing in front of the mirror, slowly building my confidence and skill. This guide is built from those real-world trials, designed to help you master this simple, yet transformative, beauty step.

Quick Overview
This guide will walk you through the essentials of eyeliner application, helping you achieve a polished look with ease.
You will learn to select the right tools, prepare your eyelids, and apply eyeliner smoothly and confidently.
Step-by-Step Instructions
Step 1: Gather Your Essential Tools
Before you begin, ensure you have everything within reach. This makes the process smoother and less stressful. Having your tools ready helps create a calm, focused environment for your morning ritual.
Consider the type of eyeliner that best suits a beginner. Pencil eyeliners are often the easiest to control and forgive mistakes. Gel eyeliners in a pot, applied with a brush, offer a smooth glide and rich color. Liquid eyeliners provide the sharpest line but require the steadiest hand.
For your first attempts, a pencil or gel liner is usually recommended. They allow for a softer line and are easier to correct.
Pro Tip: Choose an eyeliner in a dark brown or charcoal shade for your first few tries. It’s less stark than black and more forgiving if your line isn’t perfectly straight. This gentle approach reduces pressure.
Step 2: Prepare Your Eyelids
A clean, smooth canvas is key for successful eyeliner application. Gently cleanse your face and ensure your eyelids are free of oil or previous makeup. This simple step helps your eyeliner adhere better and last longer.
Apply a thin layer of eyeshadow primer if you have oily eyelids. This creates an even surface and helps prevent smudging throughout the day. Think of it as preparing your space for a mindful activity.
Allow the primer to dry completely before moving on. This brief pause is a moment to breathe and center yourself.
Step 3: Steady Your Hand and Position Your Mirror
Finding a comfortable and stable position is crucial for precision. Sit at a table or vanity where you can rest your elbow on a stable surface. This significantly reduces wobbles.
Position your mirror so you are looking slightly downwards into it. This allows you to see your lash line more clearly without your eyelid folding. Good posture supports both your physical comfort and your focus.
Take a slow, deep breath before you start. This small self-care practice can calm any jitters.
Step 4: Map Your Line (An Optional Guide)
For beginners, creating a dotted guide can be incredibly helpful. This technique breaks down the task into smaller, manageable parts. It reduces the feeling of needing to draw one perfect line.
Place small dots along your upper lash line, starting from the inner corner and extending to the outer corner. Keep these dots as close to the lashes as possible. These dots act as a gentle roadmap.
Pro Tip: If using a pencil, gently press the pencil into the lash line in short, connected dashes instead of dots. This creates a similar guiding line.
Step 5: Apply Your Eyeliner with Short Strokes
Now it’s time to connect the dots or extend your short dashes. The key is to use small, controlled strokes rather than trying to draw one continuous line. This method builds confidence gradually.
Start at the inner corner of your eye, very close to your lash line. Work your way outwards, connecting your dots or dashes. Keep the line thin at first.
If using a pencil, glide it gently along the lash line. For gel liner, dip your brush and press it into the lash line. With liquid liner, use the tip to create a fine line.
Build the thickness gradually if desired. Remember, it’s easier to add more product than to remove it. Patience here is a form of self-kindness.
Step 6: Define Your Wing (Optional Step)
A winged eyeliner can elevate your look, but it takes practice. Don’t feel pressured to perfect it immediately. This is a journey, not a race.
Imagine a line extending from your lower lash line upwards towards the tail of your eyebrow. This helps determine the angle of your wing. You can even place a small dot where you want your wing to end.
Draw a short, thin line from the outer corner of your upper lash line, following that imaginary angle. This is the bottom edge of your wing.
Connect the tip of this line back to the middle of your upper lash line, forming a triangle.
Fill in the triangle carefully with your eyeliner. Take your time with this step, focusing on symmetry.
Pro Tip: For a super crisp wing, place a piece of tape from your lower lash line towards your temple before drawing. The tape acts as a stencil. Gently remove it after applying.
Step 7: Clean Up Any Smudges
Mistakes happen, especially when you’re learning. This is part of the process, and it’s perfectly fine. Acknowledge it, and then gently correct it.
Dip a cotton swab in a little makeup remover or micellar water. Gently trace along any smudged areas or uneven lines. This precise cleanup can perfect your look.
Blot away any excess product with a clean part of the swab. This step is about refining, not erasing.
Step 8: Set Your Look (For Longevity)
To help your eyeliner last all day, consider a setting step. This is especially helpful if you have oily skin or want maximum wear. It’s a small habit that yields great results.
Dust a tiny amount of translucent setting powder over your eyeliner with a small brush. This helps absorb oil and lock the liner in place. This can be a final touch to your morning self-care routine.
Alternatively, use an eyeshadow in a similar color to gently pat over your eyeliner. This layers the product, enhancing its staying power.
Common Mistakes to Avoid
Pulling Your Eye Too Taut
Many beginners pull their eyelid outwards to create a flatter surface. While this seems logical, it distorts the natural shape of your eye. When you release your skin, the eyeliner line can appear wavy or uneven.
Instead, look slightly downwards into your mirror. Gently lift your eyebrow to slightly stretch the eyelid without pulling. This technique keeps your eye’s natural curve, resulting in a smoother, more accurate line.
Applying Too Much Product at Once
Trying to create a thick, bold line in one go often leads to smudges and unevenness. It’s harder to control a large amount of product. This can quickly turn a calm morning into a rushed, frustrating one.
Start with a very thin line, then gradually build up the thickness. Use short, light strokes. This measured approach allows for better control and easier corrections, promoting a sense of calm and mastery.
Not Lining Close Enough to the Lashes
A common issue is leaving a small gap between your eyeliner and your lash line. This creates a noticeable space that can make your lashes look sparse or your liner appear to float above your eye.
Focus on pressing the eyeliner directly into the base of your lashes. Wiggle the pencil or brush gently into the lash line. This technique fills in any gaps, making your lashes appear fuller and your eyeliner seamless.
Rushing the Process
Eyeliner application benefits greatly from patience and a steady hand. Rushing can lead to mistakes, frustration, and a less polished result. This is a moment for mindful attention.
Allocate sufficient time for this step in your morning routine. If you feel rushed, take a deep breath and remind yourself that practice makes progress. Approaching it with a calm mindset transforms it from a chore into a self-care practice.
Troubleshooting
Uneven Wings
Achieving symmetrical wings can be challenging, even for experienced users. It’s a common hurdle on the path to mastering eyeliner. Remember, your face isn’t perfectly symmetrical, so your wings might not be either.
If one wing is slightly higher or longer, use a cotton swab dipped in micellar water to gently reshape the problematic wing. You can also add a tiny bit more liner to the other wing to match. Small adjustments make a big difference.
Smudging Throughout the Day
Eyeliner that smudges can be frustrating, especially if you have oily eyelids or live in a humid climate. This can make your eyes look tired or messy. Addressing it can improve your overall comfort and confidence.
Ensure you use an eyeshadow primer before applying eyeliner. Opt for waterproof or long-wear eyeliner formulas. Set your eyeliner with a translucent powder or a matching eyeshadow. These steps create a barrier against oil and moisture.
Difficulty Drawing a Straight Line
Many beginners struggle with drawing a perfectly straight line, often resulting in wobbly or jagged edges. This is a very normal part of the learning curve. Consistency comes with practice.
Break the line into several tiny dashes or dots, then connect them with short, controlled strokes. Rest your elbow on a stable surface for support. Consistent practice, even for just a minute each day, will build your muscle memory and precision.
Key Takeaways
Frequently Asked Questions
What’s the best eyeliner for beginners?
For beginners, a pencil eyeliner or a gel pot eyeliner with a fine brush is generally recommended. Pencil liners offer good control and are easy to blend or correct. Gel liners provide a smooth application and rich color, allowing for a bit more precision than liquid initially.
How do I make my eyeliner last all day?
To make your eyeliner last, always start with a clean, primed eyelid. Use a long-wear or waterproof formula. After application, gently set your eyeliner with a small amount of translucent powder or a matching matte eyeshadow. This layering technique helps lock it in place.
Should I do my eyeliner before or after eyeshadow?
This often depends on the type of eyeliner and the desired look. If you’re using a pencil or gel liner and want a softer, smudged effect, apply it before eyeshadow. For a crisp, defined line with liquid eyeliner, it’s often best to apply it after your eyeshadow is complete.
How do I remove eyeliner easily?
To remove eyeliner without tugging at your delicate eye area, use a gentle, oil-based makeup remover or micellar water. Soak a cotton pad or swab with the remover and gently press it onto your eyelid for a few seconds. Then, gently wipe away the eyeliner in a downward motion.
Our Top Recommended Finds
These are generic suggestions for products that can support your eyeliner journey.
Embrace Your Inner Artist: A Journey of Self-Expression
Learning to apply eyeliner is more than just a beauty skill; it’s a small act of self-care and self-expression. Each time you practice, you’re building not only your dexterity but also your confidence. This simple habit can become a mindful moment in your day, a chance to focus and create.
Don’t be discouraged by initial challenges. Every expert started as a beginner. Celebrate your progress, however small. Perhaps your next step could be exploring a new eyeshadow technique, or simply taking five extra minutes each morning for a quiet cup of tea. Embrace these small habits that nurture your well-being.