🤸 How To Do A Push Up For Beginners
🍏 The Daily Wellness Essentials
Building a healthier lifestyle doesn't require extreme makeovers—it's about making daily habits effortless. These are the 5 foundational tools that nutritionists and fitness experts universally recommend to keep hydration, nutrition, and movement on track every single day.
💧 Stanley Quencher H2.0 40oz Tumbler
The viral cup that genuinely lives up to the hype. Hydration is the undisputed foundation of health, and this massive, car-cup-holder-friendly insulated tumbler makes hitting your daily water intake goals completely thoughtless and remarkably easy.
🥑 Vitamix 5200 Professional-Grade Blender
The undisputed gold standard of blenders. Nutritionists swear by it because it completely pulverizes greens, seeds, and frozen fruits into silken smoothies without chunks—the absolute best investment for sneaking more whole foods into your daily routine.
🧘♀️ Manduka PRO Extra Thick Yoga Mat
Whether you are stretching to prevent back pain or doing intense home workouts, joint protection is critical. This ultra-dense, lifetime-guaranteed mat provides unmatched support and stability, making home exercise significantly more comfortable.
🍱 Bayco Glass Meal Prep Containers
The secret to eating healthy all week is preparation. Moving away from toxic plastics to these durable, oven-safe, and leak-proof glass containers makes storing, reheating, and actually enjoying your healthy prepped meals so much cleaner and safer.
🌱 Amazing Grass Greens Blend Superfood
Even with the best intentions, our diets often fall short on micronutrients. A single scoop of this high-quality greens powder covers your nutritional bases, boosts natural daytime energy without the jittery caffeine crash, and noticeably improves digestion.
I remember the first time I tried to do a push-up on a dusty gym floor years ago.
My arms shook like autumn leaves, and I barely moved an inch before collapsing into a laughing heap.
Through trial, error, and a lot of patience, I learned that this movement is not about brute force, but about a gentle connection between your mind and your body.
Since then, I have helped countless friends and clients find their own strength through this simple, timeless exercise.
This guide is built on those years of experience to help you start your journey with confidence and ease.

Quick Overview
Mastering the push-up is one of the most rewarding milestones in a wellness journey.
It requires no fancy equipment and can be done anywhere, making it the ultimate tool for a sustainable lifestyle.
- Time needed: 10–15 minutes for practice
- Difficulty: Beginner
- What you’ll need: A flat surface, comfortable clothes, and a positive mindset
Step-by-Step Instructions
Step 1: Prepare Your Space and Mind
Find a quiet spot in your home where you feel relaxed and focused.
Clear away any clutter so you have plenty of room to stretch out your arms and legs.
Set a simple intention for your practice, such as “I am building my strength” or “I am caring for my body.”
Pro Tip: Playing some soft, upbeat music can help create a supportive atmosphere for your movement session.
Step 2: Warm Up Your Joints
Circle your wrists gently in both directions to prepare them for supporting your weight.
Roll your shoulders back and down to release any tension you might be carrying from the day.
Swing your arms side to side to get the blood flowing through your chest and back muscles.
Step 3: Find Your Hand Placement
Lower yourself down to the floor on your hands and knees.
Place your hands slightly wider than shoulder-width apart on the ground.
Spread your fingers wide to create a stable base, pressing your palms firmly into the floor.
Step 4: Align Your Body
Step your feet back one at a time until your legs are straight behind you.
Imagine a straight line running from the top of your head all the way down to your heels.
Tuck your tailbone slightly to keep your back flat and prevent your hips from dipping toward the floor.
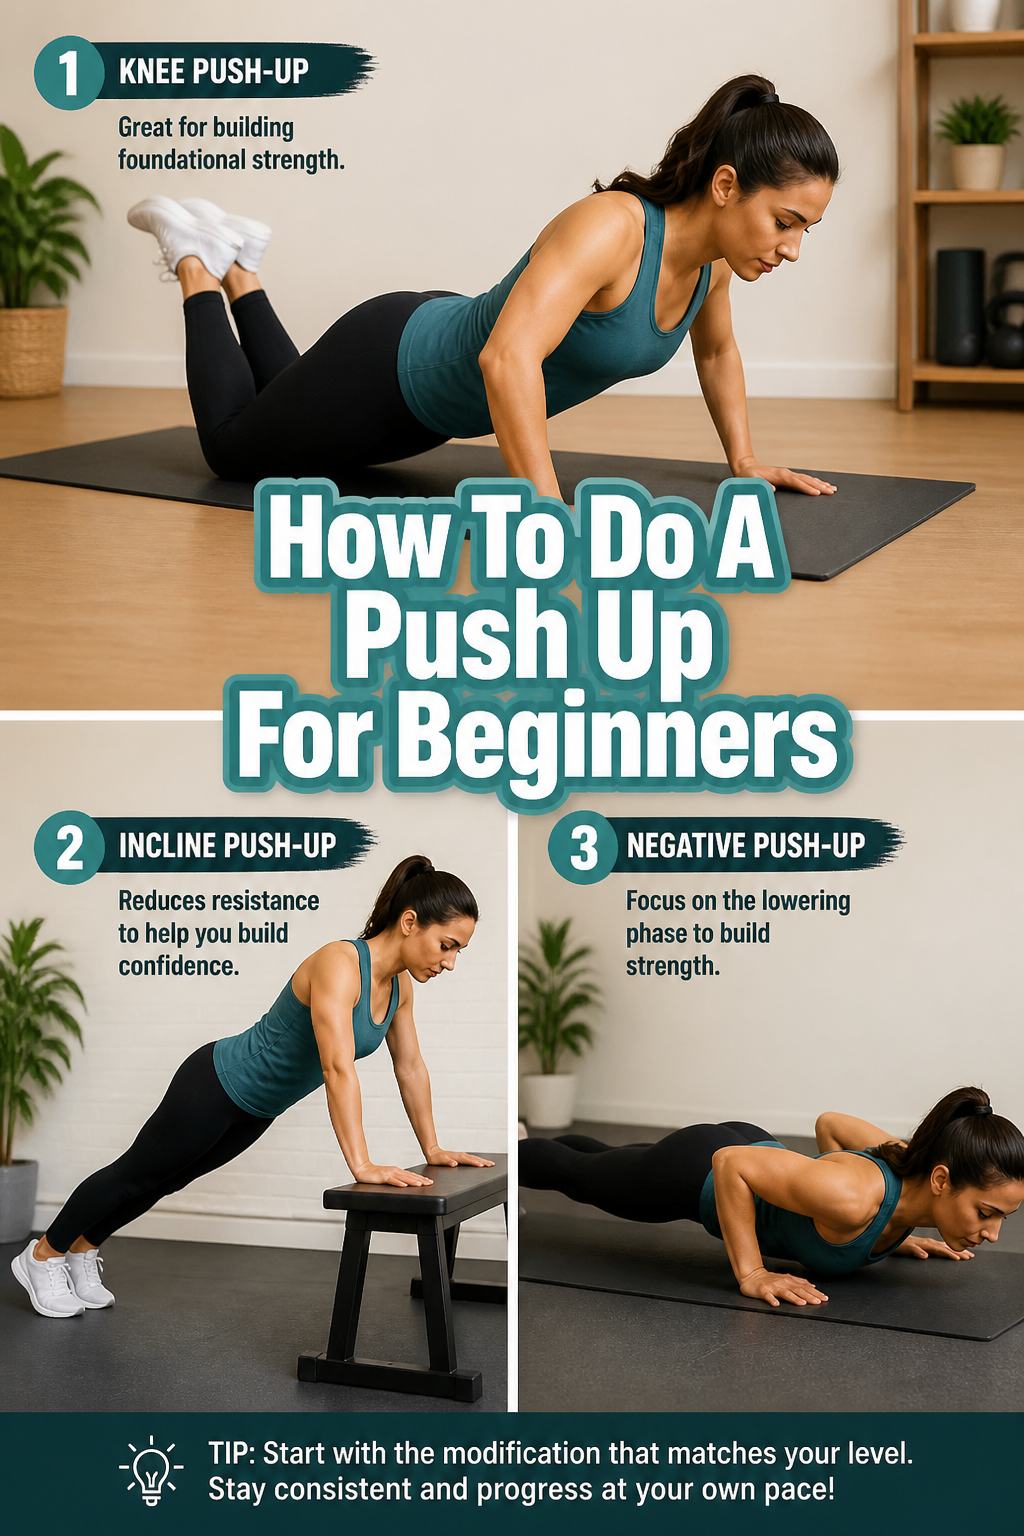
Pro Tip: If holding a full plank feels too heavy right now, simply keep your knees on the floor for a gentler version.
Step 5: Engage Your Core
Tighten your stomach muscles as if you are bracing for a gentle hug.
Squeeze your glutes to help stabilize your lower body and keep your spine protected.
Look at a spot about six inches in front of your hands to keep your neck in a neutral, comfortable position.
Step 6: Lower With Control
Inhale deeply as you begin to bend your elbows to lower your chest toward the floor.
Keep your elbows tucked at about a 45-degree angle relative to your torso, rather than letting them flare out to the sides.
Stop when your chest is just a few inches above the ground, or as low as you can go while maintaining your form.
Step 7: Push Back Up
Exhale forcefully as you press through your palms to return to the starting position.
Focus on moving your entire body as one solid unit rather than leading with your chest or hips.
Straighten your arms fully at the top, but avoid locking your elbows out harshly.
Pro Tip: Focus on the quality of the movement rather than how many times you can do it. One perfect push-up is better than ten shaky ones.
Step 8: Stretch and Reflect
Sit back on your heels in a child’s pose once you have finished your repetitions.
Reach your arms forward to feel a gentle stretch through your shoulders and upper back.
Take a moment to thank your body for the work it just did, regardless of how many reps you completed.
Common Mistakes to Avoid
The Flaring Elbow Position
Many beginners naturally let their elbows point straight out to the sides, forming a “T” shape with their body.
This puts unnecessary pressure on the delicate structures of the shoulder and can make the movement feel much harder than it needs to be.
Instead, try to keep your elbows tucked closer to your ribs, creating an “arrow” shape when viewed from above.
The Sagging Midsection
When the core muscles get tired, it is common for the hips to drop toward the floor, creating a curve in the lower back.
This “banana back” takes the focus away from the muscles you want to work and can lead to discomfort later on.
Keep your glutes squeezed and your belly button pulled in to maintain that beautiful, straight line from head to toe.
The Piking Hip Habit
On the flip side, some people push their hips high into the air, which turns the exercise into more of a shoulder press.
This often happens because the body is trying to find an easier way to move, but it reduces the effectiveness of the push-up.
Check your reflection in a mirror or record a quick video of yourself to ensure your hips stay level with your shoulders.
Troubleshooting
Wrist Discomfort During the Move
If your wrists feel tight or uncomfortable, it might be because they aren’t used to being at a sharp angle while supporting weight.
You can try doing your push-ups while holding onto a pair of dumbbells or specialized push-up handles to keep your wrists straight.
Alternatively, practicing on a softer surface like a yoga mat can provide a bit more cushion and support.
Shaking Arms and Shoulders
It is perfectly normal for your muscles to tremble a little bit when you are learning a new movement or building strength.
This is just your nervous system learning how to coordinate the exercise and your muscles working hard to stabilize you.
If the shaking becomes intense, take a short break or switch to an incline push-up by placing your hands on a sturdy bench or table.
Difficulty Reaching the Floor
If you find that you can only lower yourself an inch or two, do not be discouraged at all.
Strength is built in stages, and your range of motion will naturally increase as you practice more consistently.
You can also practice “negatives,” where you focus only on lowering yourself slowly to the floor and then use your knees to get back up.
Key Takeaways
- Form is everything: Prioritize a straight back and tucked elbows over the total number of repetitions you perform.
- Consistency wins: Doing three push-ups every morning is more effective for your long-term wellness than doing fifty once a month.
- Listen to your body: It is okay to start with your knees on the floor or use an incline to make the movement more accessible.
- Breathe intentionally: Use your breath to power the movement, inhaling on the way down and exhaling on the way up.
- Celebrate progress: Every small improvement, even just feeling more stable in your plank, is a victory worth celebrating.
Frequently Asked Questions
Can I do push-ups every single day?
While your body loves movement, it also needs time to rest and recover so it can grow stronger.
For most beginners, practicing every other day is a great way to see progress without feeling overly tired.
Listen to your body’s signals; if you feel very sore, give yourself an extra day of gentle stretching instead.
How long will it take to see results?
Wellness is a journey, not a race, but you will likely feel more confident and stable within just a few weeks of regular practice.
You might notice that your posture improves or that everyday tasks, like carrying groceries, feel just a little bit lighter.
Focus on the feeling of being capable and strong rather than looking for immediate physical changes.
What if I cannot do even one push-up yet?
That is a perfectly fine place to start, and many people begin their journey exactly there.
Try “wall push-ups” by standing a few feet away from a wall and pressing your hands against it to move your body back and forth.
As that becomes easy, move to a kitchen counter, then a sturdy chair, and eventually to the floor.
Our Top Recommended Finds
- A High-Quality Yoga Mat: A good mat provides the necessary grip for your hands and feet while offering a comfortable cushion for your knees.
- Push-Up Handles: These tools allow for a neutral wrist position, which can be a game-changer if you experience any joint sensitivity.
- Resistance Bands: These are wonderful for warming up your shoulders or providing a bit of assistance if you loop them around your hips while practicing.
Embrace Your Strength One Rep At A Time
Starting a new physical habit is an act of self-care that ripples through every area of your life.
When you master the push-up, you aren’t just building muscle; you are proving to yourself that you can tackle challenges with grace.
Consider making this part of your morning routine, perhaps right after you hydrate and before you check your phone.
Combine this practice with other healthy habits like mindful walking or a few minutes of quiet meditation to create a holistic sense of well-being.
If you enjoyed learning about this foundational movement, you might also find joy in exploring gentle yoga flows or basic bodyweight squats.
The most important step is the one you take today, so find a spot on the floor and give it a try.
You are stronger than you think, and I am cheering for you every step of the way.